Keeping light-weight material on your Glowforge, or another laser cutter, the cutting bed can be a pain in the ass. So what can be done about it? A lot actually. Some people use small weights. Others use clips that clip into the hex grid of the Glowforge laser cutter. I prefer to use some powerful magnets from old (dead) hard drives. Combine them with a little bit of scrap acrylic and you’ve got a nice custom solution to help you keep your laser material in check.
The List
- Old Hard Drive Magnets
- Acrylic (Can be any color, I had scrap .08 clear acrylic that I used.)
- Glowforge (Or another laser cutter)
- Adhesive
The Directions
1. Farm/Mine your magnet(s)
I could go into an overly complicated how-to here, but I don’ need to. Check out this youtube video on How-to remove the magnets from a hard drive. (Not My Movie, just one I found that was easy to follow)
2. Design an acrylic case for the magnet(s)
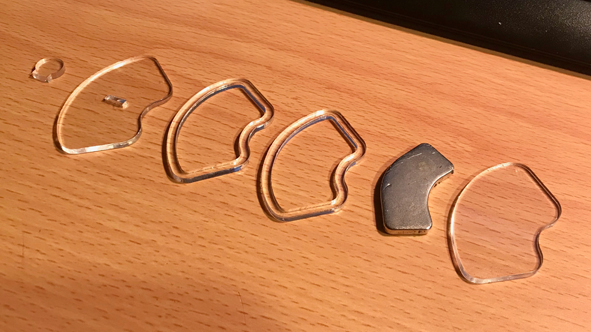
I scanned the magnets on my flatbed scanner to get the exact shape and size of the magnets. I then imported the image into Adobe Illustrator and used the pen tool to replicate the outline of the magnets. I then used the offset path feature (Object>Path>Offset Path) function to make a slightly larger shape and again to make the outer edge. I combined the shapes to make a hollow shape that would encase the magnets. Due to the thickness of the magnet vs. the thickness of the acrylic, I had to double up on the hollow pieces for each magnet.
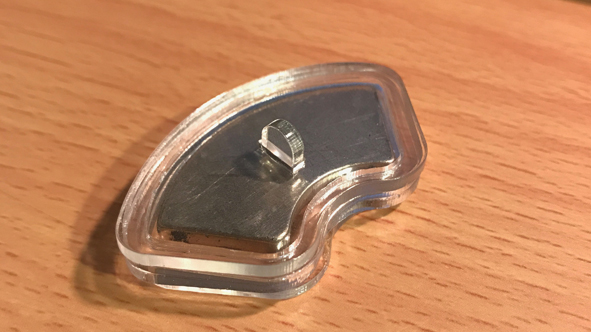
I then designed a small round handle to put on the top of each acrylic magnet case. Just to make them a little easier to pick up. I actually ended up removing them because, on a thick piece, they were in the way of the laser print head. So you can remove them and the cut into the top acrylic piece for a cleaner look. The neodymium magnets in the hard drives are super strong. The .02in thickness of the acrylic lifts them off the metal cutting bed on thinner materials just enough to make them easier to pick up off the bed so the handle really wasn’t needed.
Want to try it yourself? Here’s a helping hand, download my .SVG file and make a magnet case yourself!
3. Cut the acrylic pieces
Pretty self-explanatory. I have a Glowforge Pro and here are the settings I used…
Full Power Pew Pews/200 Zoom Zooms
4. Assemble your new Neodymium magnet cases
This is where your adhesive comes in to play. At the time I just used what I had available to me, E6000 Industrial Strength Adhesive. I’ve since bought some acrylic adhesive that dries clear and is super strong, but the E6000 is still holding strong.
Put the case together with the base (filled part without the notch) on the bottom, 1 or 2 hollow pieces next, followed lastly by the top which has the small rectangle cut in for the handle. Glude/adhere each piece as you go. I let the adhesive cure overnight. The final piece is small enough that I was able to use small clamps to keep the pressure on the pieces.
5. Enjoy!
These neodymium magnets work great on materials like Paper, leather, ever cardboard. Any material that could get blown away by the exhaust/blower fan. They look kinda cool too. Mine cracked a little because I guess the clamps I used were a little TOO tight, but they still work. Simply place them on top of the material you are cutting/engraving. If you decide to keep the small handle on them you can use them to pick the magnets up off the material. Like I said, I took mine off and I just pick them up from their sides. Hope you like this quick how-to!


